iOS开发-iOS中的八种锁

在iOS开发中,经常会用到多线程开发的情况,这时候如果多个线程同时访问同一块资源时,就很容易引发数据错乱和数据安全的问题,这个时候我们就需要有一个方法来保证每次只有一个线程访问这一块资源,这个方法就是

iOS中一共有8中常用的锁,我们用YY大神的一张图来看一下这些锁的性能。
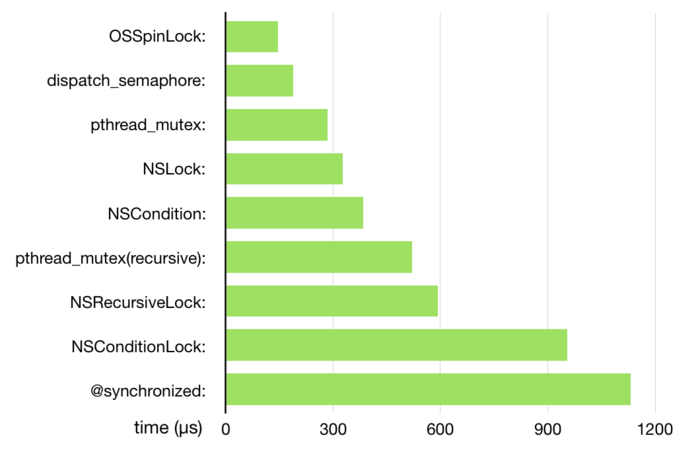
logo

OSSpinLock 自旋锁

OSSpinLock 自旋锁在图表中可以看到,性能是最高的,大概在150us,但是YY大神在不再安全的 OSSpinLock中说道OSSpinLock自旋锁已经不再安全了。

而且也可以看到OSSpinLock已经在iOS 10.0之后废弃了。

logo

好了,接下来看一下OSSpinLock中的方法。

  • OS_SPINLOCK_INIT: 默认值为 0,在 locked 状态时就会大于 0,unlocked状态下为 0
  • OSSpinLockLock(&oslock):上锁,参数为 OSSpinLock 地址
  • OSSpinLockUnlock(&oslock):解锁,参数为 OSSpinLock 地址
  • OSSpinLockTry(&oslock):尝试加锁,可以加锁则立即加锁并返回 YES,反之返回 NO

接下来我们测试一下,比如下面一段代码中,我们开启两个异步线程。

1
2
3
4
5
6
7
8
9
10
11
12
13
14
15
16
17
18
19
20
21
22
23
- (void)setOSSpinLock
{
__block OSSpinLock ossPinLock = OS_SPINLOCK_INIT;
__block NSInteger number = 10;
dispatch_async(dispatch_get_global_queue(DISPATCH_QUEUE_PRIORITY_DEFAULT, 0), ^{
NSLog(@"当前线程:%@,number=%ld",[NSThread currentThread],number);
number += 10;
NSLog(@"当前线程:%@,number=%ld",[NSThread currentThread],number);
});
dispatch_async(dispatch_get_global_queue(DISPATCH_QUEUE_PRIORITY_DEFAULT, 0), ^{
NSLog(@"当前线程:%@,number=%ld",[NSThread currentThread],number);
number += 20;
NSLog(@"当前线程:%@,number=%ld",[NSThread currentThread],number);
});
}

可以看到打印出来的数据都是错乱的:

1
2
3
4
2018-04-23 16:33:12.655341+0800 LockDemo[88725:6234113] 当前线程:<NSThread: 0x604000270d00>{number = 3, name = (null)},number=10
2018-04-23 16:33:12.655341+0800 LockDemo[88725:6234116] 当前线程:<NSThread: 0x60000026f340>{number = 4, name = (null)},number=10
2018-04-23 16:33:12.655651+0800 LockDemo[88725:6234116] 当前线程:<NSThread: 0x60000026f340>{number = 4, name = (null)},number=40
2018-04-23 16:33:12.655655+0800 LockDemo[88725:6234113] 当前线程:<NSThread: 0x604000270d00>{number = 3, name = (null)},number=40

这时候,我们添加一下上OSSpinLock自旋锁:

首先引入OSSpinLock自旋锁的库:

1
#import <libkern/OSAtomic.h>
1
2
3
4
5
6
7
8
9
10
11
12
13
14
15
16
17
18
19
20
21
22
23
24
25
26
27
28
29
30
31
32
33
34
35
- (void)setOSSpinLock
{
__block OSSpinLock ossPinLock = OS_SPINLOCK_INIT;
__block NSInteger number = 10;
dispatch_async(dispatch_get_global_queue(DISPATCH_QUEUE_PRIORITY_DEFAULT, 0), ^{
NSLog(@"当前线程:%@,OSSpinLock上锁",[NSThread currentThread]);
OSSpinLockLock(&ossPinLock);
NSLog(@"当前线程:%@,number=%ld",[NSThread currentThread],number);
number += 10;
NSLog(@"当前线程:%@,number=%ld",[NSThread currentThread],number);
NSLog(@"当前线程:%@,OSSpinLock解锁",[NSThread currentThread]);
OSSpinLockUnlock(&ossPinLock);
});
dispatch_async(dispatch_get_global_queue(DISPATCH_QUEUE_PRIORITY_DEFAULT, 0), ^{
NSLog(@"当前线程:%@,OSSpinLock上锁",[NSThread currentThread]);
OSSpinLockLock(&ossPinLock);
NSLog(@"当前线程:%@,number=%ld",[NSThread currentThread],number);
number += 20;
NSLog(@"当前线程:%@,number=%ld",[NSThread currentThread],number);
NSLog(@"当前线程:%@,OSSpinLock解锁",[NSThread currentThread]);
OSSpinLockUnlock(&ossPinLock);
});
}

可以看到打印的数据:

1
2
3
4
5
6
7
8
2018-04-23 16:34:40.764216+0800 LockDemo[88797:6236783] 当前线程:<NSThread: 0x60000027dcc0>{number = 3, name = (null)},OSSpinLock上锁
2018-04-23 16:34:40.764216+0800 LockDemo[88797:6236781] 当前线程:<NSThread: 0x60000027da40>{number = 4, name = (null)},OSSpinLock上锁
2018-04-23 16:34:40.764450+0800 LockDemo[88797:6236783] 当前线程:<NSThread: 0x60000027dcc0>{number = 3, name = (null)},number=10
2018-04-23 16:34:40.764577+0800 LockDemo[88797:6236783] 当前线程:<NSThread: 0x60000027dcc0>{number = 3, name = (null)},number=20
2018-04-23 16:34:40.764736+0800 LockDemo[88797:6236783] 当前线程:<NSThread: 0x60000027dcc0>{number = 3, name = (null)},OSSpinLock解锁
2018-04-23 16:34:40.766647+0800 LockDemo[88797:6236781] 当前线程:<NSThread: 0x60000027da40>{number = 4, name = (null)},number=20
2018-04-23 16:34:40.766910+0800 LockDemo[88797:6236781] 当前线程:<NSThread: 0x60000027da40>{number = 4, name = (null)},number=40
2018-04-23 16:34:40.768117+0800 LockDemo[88797:6236781] 当前线程:<NSThread: 0x60000027da40>{number = 4, name = (null)},OSSpinLock解锁

dispatch_semaphore 信号量

信号量是仅次于自旋锁的方法,使用的是GCD提供的API:

  • dispatch_semaphore_create 创建一个Semphore并初始化信号的总量。
  • dispatch_semaphore_signal 发送一个信号,让信号总量加1。
  • dispatch_semaphore_wait 可以使总信号量减1,让信号总量为0时就会一直等待,否则就可以正常执行。

这次我们就不上测试的代码了,直接放上增加信号量的代码:

1
2
3
4
5
6
7
8
9
10
11
12
13
14
15
16
17
18
19
20
21
22
23
24
25
26
27
28
29
30
31
32
33
34
35
36
- (void)setSemaphore
{
dispatch_semaphore_t semaphore = dispatch_semaphore_create(0);
dispatch_time_t overTime = dispatch_time(DISPATCH_TIME_NOW, 3.0f * NSEC_PER_SEC);
__block NSInteger number = 10;
dispatch_async(dispatch_get_global_queue(DISPATCH_QUEUE_PRIORITY_DEFAULT, 0), ^{
NSLog(@"当前线程:%@,semaphore信号量+1",[NSThread currentThread]);
dispatch_semaphore_signal(semaphore);
NSLog(@"当前线程:%@,number=%ld",[NSThread currentThread],number);
number += 10;
NSLog(@"当前线程:%@,number=%ld",[NSThread currentThread],number);
NSLog(@"当前线程:%@,semaphore信号量-1",[NSThread currentThread]);
dispatch_semaphore_wait(semaphore, overTime);
});
dispatch_async(dispatch_get_global_queue(DISPATCH_QUEUE_PRIORITY_DEFAULT, 0), ^{
NSLog(@"当前线程:%@,semaphore信号量+1",[NSThread currentThread]);
dispatch_semaphore_signal(semaphore);
NSLog(@"当前线程:%@,number=%ld",[NSThread currentThread],number);
number += 20;
NSLog(@"当前线程:%@,number=%ld",[NSThread currentThread],number);
NSLog(@"当前线程:%@,semaphore信号量-1",[NSThread currentThread]);
dispatch_semaphore_wait(semaphore, overTime);
});
}

打印结果:

1
2
3
4
5
6
7
8
2018-04-23 17:05:22.368340+0800 LockDemo[89577:6266694] 当前线程:<NSThread: 0x60000026ed00>{number = 3, name = (null)},semaphore信号量+1
2018-04-23 17:05:22.368340+0800 LockDemo[89577:6266693] 当前线程:<NSThread: 0x60000026ed80>{number = 4, name = (null)},semaphore信号量+1
2018-04-23 17:05:22.368625+0800 LockDemo[89577:6266694] 当前线程:<NSThread: 0x60000026ed00>{number = 3, name = (null)},number=10
2018-04-23 17:05:22.368630+0800 LockDemo[89577:6266693] 当前线程:<NSThread: 0x60000026ed80>{number = 4, name = (null)},number=10
2018-04-23 17:05:22.368763+0800 LockDemo[89577:6266694] 当前线程:<NSThread: 0x60000026ed00>{number = 3, name = (null)},number=20
2018-04-23 17:05:22.368888+0800 LockDemo[89577:6266694] 当前线程:<NSThread: 0x60000026ed00>{number = 3, name = (null)},semaphore信号量-1
2018-04-23 17:05:22.368887+0800 LockDemo[89577:6266693] 当前线程:<NSThread: 0x60000026ed80>{number = 4, name = (null)},number=40
2018-04-23 17:05:22.369799+0800 LockDemo[89577:6266693] 当前线程:<NSThread: 0x60000026ed80>{number = 4, name = (null)},semaphore信号量-1

pthread_mutex 互斥锁

YY大神在之前的文章中已经说过OSSpinLock已经不再是线程安全的并把自己开源项目中的OSSpinLock都换成了pthread_mutex。

接下来我们看一下互斥锁提供的方法:

  • pthread_mutex_init(&pLock, NULL);:参数为 pthread_mutex 地址,第二个参数默认PTHREAD_MUTEX_NORMAL
  • pthread_mutex_lock(&pLock):上锁,参数为 pthread_mutex 地址
  • pthread_mutex_unlock(&pLock):解锁,参数为 pthread_mutex 地址
  • pthread_mutex_trylock(&pLock):尝试加锁,可以加锁则立即加锁并返回 0 ,否者返回一个错误提示码。

接下来看代码:

1
2
3
4
5
6
7
8
9
10
11
12
13
14
15
16
17
18
19
20
21
22
23
24
25
26
27
28
29
30
31
32
33
34
35
36
37
- (void)setPthread_mutex
{
static pthread_mutex_t pLock;
pthread_mutex_init(&pLock, NULL);
__block NSInteger number = 10;
dispatch_async(dispatch_get_global_queue(DISPATCH_QUEUE_PRIORITY_DEFAULT, 0), ^{
NSLog(@"当前线程:%@,上锁",[NSThread currentThread]);
pthread_mutex_lock(&pLock);
NSLog(@"当前线程:%@,number=%ld",[NSThread currentThread],number);
number += 10;
NSLog(@"当前线程:%@,number=%ld",[NSThread currentThread],number);
NSLog(@"当前线程:%@,解锁",[NSThread currentThread]);
pthread_mutex_unlock(&pLock);
});
dispatch_async(dispatch_get_global_queue(DISPATCH_QUEUE_PRIORITY_DEFAULT, 0), ^{
NSLog(@"当前线程:%@,上锁",[NSThread currentThread]);
pthread_mutex_lock(&pLock);
NSLog(@"当前线程:%@,number=%ld",[NSThread currentThread],number);
number += 20;
NSLog(@"当前线程:%@,number=%ld",[NSThread currentThread],number);
NSLog(@"当前线程:%@,解锁",[NSThread currentThread]);
pthread_mutex_unlock(&pLock);
});
}

然后是打印结果:

1
2
3
4
5
6
7
8
2018-04-23 17:13:09.376128+0800 LockDemo[89821:6278824] 当前线程:<NSThread: 0x600000474900>{number = 3, name = (null)},上锁
2018-04-23 17:13:09.376128+0800 LockDemo[89821:6278825] 当前线程:<NSThread: 0x6000004744c0>{number = 4, name = (null)},上锁
2018-04-23 17:13:09.376419+0800 LockDemo[89821:6278824] 当前线程:<NSThread: 0x600000474900>{number = 3, name = (null)},number=10
2018-04-23 17:13:09.376547+0800 LockDemo[89821:6278824] 当前线程:<NSThread: 0x600000474900>{number = 3, name = (null)},number=20
2018-04-23 17:13:09.376759+0800 LockDemo[89821:6278824] 当前线程:<NSThread: 0x600000474900>{number = 3, name = (null)},解锁
2018-04-23 17:13:09.378000+0800 LockDemo[89821:6278825] 当前线程:<NSThread: 0x6000004744c0>{number = 4, name = (null)},number=20
2018-04-23 17:13:09.378627+0800 LockDemo[89821:6278825] 当前线程:<NSThread: 0x6000004744c0>{number = 4, name = (null)},number=40
2018-04-23 17:13:09.378846+0800 LockDemo[89821:6278825] 当前线程:<NSThread: 0x6000004744c0>{number = 4, name = (null)},解锁

pthread_mutex(recursive) 递归锁

递归锁最大的特点就是允许同一个线程在未释放其拥有的锁时反复对该锁进行加锁操作。而之前介绍的几种锁可以看到,加锁后只能有一个线程访问该对象,后面的线程需要排队,并且lock和unlock都是对应出现的。

下面是代码:

1
2
3
4
5
6
7
8
9
10
11
12
13
14
15
16
17
18
19
20
21
22
23
24
25
- (void)setPthreadMutexRecursive
{
static pthread_mutex_t pLock;
pthread_mutexattr_t attr;
//初始化attr并且给它赋予默认
pthread_mutexattr_init(&attr);
//设置锁类型,这边是设置为递归锁
pthread_mutexattr_settype(&attr, PTHREAD_MUTEX_RECURSIVE);
pthread_mutex_init(&pLock, &attr);
//销毁一个属性对象,在重新进行初始化之前该结构不能重新使用
pthread_mutexattr_destroy(&attr);
dispatch_async(dispatch_get_global_queue(DISPATCH_QUEUE_PRIORITY_DEFAULT, 0), ^{
static void (^RecursiveBlock)(int);
RecursiveBlock = ^(int value) {
pthread_mutex_lock(&pLock);
if (value > 0) {
NSLog(@"当前线程:%@,number=%ld",[NSThread currentThread],value);
RecursiveBlock(value - 1);
}
pthread_mutex_unlock(&pLock);
};
RecursiveBlock(5);
});
}

打印结果:

1
2
3
4
5
2018-04-23 17:34:36.252635+0800 LockDemo[90381:6304880] 当前线程:<NSThread: 0x60000046ec00>{number = 3, name = (null)},number=5
2018-04-23 17:34:36.252947+0800 LockDemo[90381:6304880] 当前线程:<NSThread: 0x60000046ec00>{number = 3, name = (null)},number=4
2018-04-23 17:34:36.253129+0800 LockDemo[90381:6304880] 当前线程:<NSThread: 0x60000046ec00>{number = 3, name = (null)},number=3
2018-04-23 17:34:36.254451+0800 LockDemo[90381:6304880] 当前线程:<NSThread: 0x60000046ec00>{number = 3, name = (null)},number=2
2018-04-23 17:34:36.254692+0800 LockDemo[90381:6304880] 当前线程:<NSThread: 0x60000046ec00>{number = 3, name = (null)},number=1

NSLock

NSLock看名字就会熟悉一些了,我们来看一下他的API:

  • lock:上锁
  • unlock:解锁
  • trylock:能加锁返回 YES 并执行加锁操作,相当于 lock,反之返回 NO。
  • lockBeforeDate:这个方法表示会在传入的时间内尝试加锁,若能加锁则执行加锁操作并返回 YES,反之返回 NO。

接下来上代码:

1
2
3
4
5
6
7
8
9
10
11
12
13
14
15
16
17
18
19
20
21
22
23
24
25
26
27
28
29
30
31
32
33
34
35
36
- (void)setNSLock
{
NSLock *lock = [NSLock new];
__block NSInteger number = 10;
dispatch_async(dispatch_get_global_queue(DISPATCH_QUEUE_PRIORITY_DEFAULT, 0), ^{
NSLog(@"当前线程:%@,NSLock上锁",[NSThread currentThread]);
[lock lock];
NSLog(@"当前线程:%@,number=%ld",[NSThread currentThread],number);
number += 10;
NSLog(@"当前线程:%@,number=%ld",[NSThread currentThread],number);
NSLog(@"当前线程:%@,NSLock解锁",[NSThread currentThread]);
[lock unlock];
});
dispatch_async(dispatch_get_global_queue(DISPATCH_QUEUE_PRIORITY_DEFAULT, 0), ^{
NSLog(@"当前线程:%@,NSLock上锁",[NSThread currentThread]);
[lock lock];
NSLog(@"当前线程:%@,number=%ld",[NSThread currentThread],number);
number += 20;
NSLog(@"当前线程:%@,number=%ld",[NSThread currentThread],number);
NSLog(@"当前线程:%@,NSLock解锁",[NSThread currentThread]);
[lock unlock];
});
}

打印结果:

1
2
3
4
5
6
7
8
2018-04-23 17:41:40.355403+0800 LockDemo[90636:6315709] 当前线程:<NSThread: 0x604000464340>{number = 4, name = (null)},NSLock上锁
2018-04-23 17:41:40.355403+0800 LockDemo[90636:6315707] 当前线程:<NSThread: 0x604000464400>{number = 3, name = (null)},NSLock上锁
2018-04-23 17:41:40.355620+0800 LockDemo[90636:6315709] 当前线程:<NSThread: 0x604000464340>{number = 4, name = (null)},number=10
2018-04-23 17:41:40.355768+0800 LockDemo[90636:6315709] 当前线程:<NSThread: 0x604000464340>{number = 4, name = (null)},number=30
2018-04-23 17:41:40.355913+0800 LockDemo[90636:6315709] 当前线程:<NSThread: 0x604000464340>{number = 4, name = (null)},NSLock解锁
2018-04-23 17:41:40.357151+0800 LockDemo[90636:6315707] 当前线程:<NSThread: 0x604000464400>{number = 3, name = (null)},number=30
2018-04-23 17:41:40.357313+0800 LockDemo[90636:6315707] 当前线程:<NSThread: 0x604000464400>{number = 3, name = (null)},number=40
2018-04-23 17:41:40.357522+0800 LockDemo[90636:6315707] 当前线程:<NSThread: 0x604000464400>{number = 3, name = (null)},NSLock解锁

NSCondition

这个方法和信号量有点相似:

  • wait:进入等待状态
  • waitUntilDate::让一个线程等待一定的时间
  • signal:唤醒一个等待的线程
  • broadcast:唤醒所有等待的线程

线程延迟执行

上代码:

1
2
3
4
5
6
7
8
9
10
11
12
13
14
15
- (void)setNSConditionUntilDate
{
NSCondition *conditionLock = [NSCondition new];
__block NSInteger number = 10;
dispatch_async(dispatch_get_global_queue(DISPATCH_QUEUE_PRIORITY_DEFAULT, 0), ^{
NSLog(@"当前线程:%@,NSCondition上锁",[NSThread currentThread]);
[conditionLock lock];
[conditionLock waitUntilDate:[NSDate dateWithTimeIntervalSinceNow:3]];
number = number + 1;
NSLog(@"number=%ld",number);
NSLog(@"当前线程:%@,number=%ld",[NSThread currentThread],number);
[conditionLock unlock];
});
}

可以看到打印代码中number=11的代码在第一次输出的3s之后。

1
2
3
2018-04-24 10:13:22.892167+0800 LockDemo[92613:6424100] 当前线程:<NSThread: 0x600000277300>{number = 3, name = (null)},NSCondition上锁
2018-04-24 10:13:25.895626+0800 LockDemo[92613:6424100] number=11
2018-04-24 10:13:25.896116+0800 LockDemo[92613:6424100] 当前线程:<NSThread: 0x600000277300>{number = 3, name = (null)},number=11

唤醒等待线程

上代码:

1
2
3
4
5
6
7
8
9
10
11
12
13
14
15
16
17
18
19
20
21
22
23
24
25
26
27
28
29
30
31
32
- (void)setNSConditionWait
{
NSCondition *conditionLock = [NSCondition new];
__block NSInteger number = 10;
dispatch_async(dispatch_get_global_queue(DISPATCH_QUEUE_PRIORITY_DEFAULT, 0), ^{
NSLog(@"当前线程:%@,NSCondition上锁",[NSThread currentThread]);
[conditionLock lock];
[conditionLock wait];
number = number + 10;
NSLog(@"number=%ld",number);
[conditionLock unlock];
});
dispatch_async(dispatch_get_global_queue(DISPATCH_QUEUE_PRIORITY_DEFAULT, 0), ^{
NSLog(@"当前线程:%@,NSCondition上锁",[NSThread currentThread]);
[conditionLock lock];
[conditionLock wait];
number = number + 20;
NSLog(@"number=%ld",number);
[conditionLock unlock];
});
dispatch_async(dispatch_get_global_queue(DISPATCH_QUEUE_PRIORITY_DEFAULT, 0), ^{
sleep(2);
NSLog(@"当前线程:%@,NSCondition唤醒等待的线程",[NSThread currentThread]);
[conditionLock signal];
});
}

打印结果:

1
2
3
4
2018-04-24 10:21:48.119910+0800 LockDemo[92914:6437121] 当前线程:<NSThread: 0x604000466d00>{number = 4, name = (null)},NSCondition上锁
2018-04-24 10:21:48.119911+0800 LockDemo[92914:6437122] 当前线程:<NSThread: 0x604000466dc0>{number = 3, name = (null)},NSCondition上锁
2018-04-24 10:21:50.121817+0800 LockDemo[92914:6437120] 当前线程:<NSThread: 0x6000002764c0>{number = 5, name = (null)},NSCondition唤醒等待的线程
2018-04-24 10:21:50.122050+0800 LockDemo[92914:6437121] number=30

唤醒所有等待线程

1
2
3
4
5
6
7
8
9
10
11
12
13
14
15
16
17
18
19
20
21
22
23
24
25
26
27
28
29
30
31
32
- (void)setNSConditionBroadcast
{
NSCondition *conditionLock = [NSCondition new];
__block NSInteger number = 10;
dispatch_async(dispatch_get_global_queue(DISPATCH_QUEUE_PRIORITY_DEFAULT, 0), ^{
NSLog(@"当前线程:%@,NSCondition上锁",[NSThread currentThread]);
[conditionLock lock];
[conditionLock wait];
number = number + 10;
NSLog(@"number=%ld",number);
[conditionLock unlock];
});
dispatch_async(dispatch_get_global_queue(DISPATCH_QUEUE_PRIORITY_DEFAULT, 0), ^{
NSLog(@"当前线程:%@,NSCondition上锁",[NSThread currentThread]);
[conditionLock lock];
[conditionLock wait];
number = number + 20;
NSLog(@"number=%ld",number);
[conditionLock unlock];
});
dispatch_async(dispatch_get_global_queue(DISPATCH_QUEUE_PRIORITY_DEFAULT, 0), ^{
sleep(2);
NSLog(@"当前线程:%@,NSCondition唤醒所有等待的线程",[NSThread currentThread]);
[conditionLock broadcast];
});
}

打印结果:

1
2
3
4
5
2018-04-24 10:23:26.901406+0800 LockDemo[92991:6440383] 当前线程:<NSThread: 0x600000277480>{number = 3, name = (null)},NSCondition上锁
2018-04-24 10:23:26.901406+0800 LockDemo[92991:6440385] 当前线程:<NSThread: 0x60400026d7c0>{number = 4, name = (null)},NSCondition上锁
2018-04-24 10:23:28.904168+0800 LockDemo[92991:6440386] 当前线程:<NSThread: 0x60400026df40>{number = 5, name = (null)},NSCondition唤醒所有等待的线程
2018-04-24 10:23:28.904544+0800 LockDemo[92991:6440383] number=20
2018-04-24 10:23:28.904763+0800 LockDemo[92991:6440385] number=40

@synchronized 条件锁

@synchronized 应该是一种比较简单的锁。

直接上代码:

1
2
3
4
5
6
7
8
9
10
11
12
13
14
15
16
17
18
19
20
21
22
23
24
25
26
27
28
- (void)setSynchronized
{
__block NSInteger number = 10;
dispatch_async(dispatch_get_global_queue(DISPATCH_QUEUE_PRIORITY_DEFAULT, 0), ^{
@synchronized (self)
{
NSLog(@"当前线程:%@,number=%ld",[NSThread currentThread],number);
number += 10;
NSLog(@"当前线程:%@,number=%ld",[NSThread currentThread],number);
}
});
dispatch_async(dispatch_get_global_queue(DISPATCH_QUEUE_PRIORITY_DEFAULT, 0), ^{
@synchronized (self)
{
NSLog(@"当前线程:%@,number=%ld",[NSThread currentThread],number);
number += 20;
NSLog(@"当前线程:%@,number=%ld",[NSThread currentThread],number);
}
});
}

打印结果:

1
2
3
4
2018-04-24 10:29:48.814631+0800 LockDemo[93300:6451071] 当前线程:<NSThread: 0x600000467900>{number = 3, name = (null)},number=10
2018-04-24 10:29:48.815056+0800 LockDemo[93300:6451071] 当前线程:<NSThread: 0x600000467900>{number = 3, name = (null)},number=20
2018-04-24 10:29:48.815291+0800 LockDemo[93300:6451070] 当前线程:<NSThread: 0x600000468000>{number = 4, name = (null)},number=20
2018-04-24 10:29:48.816572+0800 LockDemo[93300:6451070] 当前线程:<NSThread: 0x600000468000>{number = 4, name = (null)},number=40

NSConditionLock 条件锁

这个锁和NSLock相差不大,多了一个condition参数,可以理解为一个条件标示。也可以实现任务之前的互相依赖。

放代码:

1
2
3
4
5
6
7
8
9
10
11
12
13
14
15
16
17
18
19
20
21
22
23
24
25
26
27
28
29
30
31
- (void)setConditionLock
{
NSConditionLock *condationLock = [[NSConditionLock alloc] init];
//线程1
dispatch_async(dispatch_get_global_queue(DISPATCH_QUEUE_PRIORITY_DEFAULT, 0), ^{
if([condationLock tryLockWhenCondition:0]){
NSLog(@"线程1");
[condationLock unlockWithCondition:1];
}else{
NSLog(@"失败");
}
});
//线程2
dispatch_async(dispatch_get_global_queue(DISPATCH_QUEUE_PRIORITY_DEFAULT, 0), ^{
[condationLock lockWhenCondition:3];
NSLog(@"线程2");
[condationLock unlockWithCondition:2];
});
//线程3
dispatch_async(dispatch_get_global_queue(DISPATCH_QUEUE_PRIORITY_DEFAULT, 0), ^{
[condationLock lockWhenCondition:1];
NSLog(@"线程3");
[condationLock unlockWithCondition:3];
});
}

打印结果:

1
2
3
2018-04-24 10:46:04.325347+0800 LockDemo[93661:6468125] 线程1
2018-04-24 10:46:04.325573+0800 LockDemo[93661:6468124] 线程3
2018-04-24 10:46:04.325775+0800 LockDemo[93661:6468122] 线程2

由上可知,我们在初始化 NSConditionLock 对象时,给了他的标示为 0;执行 tryLockWhenCondition:时,我们传入的条件标示也是 0,所 以线程1 加锁成功;执行 unlockWithCondition:时,这时候会把condition由 0 修改为 1;因为condition 修改为了 1, 会先走到 线程3,然后 线程3 又将 condition 修改为 3,最后走了线程2 的流程。

最后

以上就是全部的内容,还是放一个demo在这里吧。