A popover is a transient view that appears above other content onscreen when you tap a control or in an area.
以上内容来自苹果官方人机交互指南中对Popover的简介。
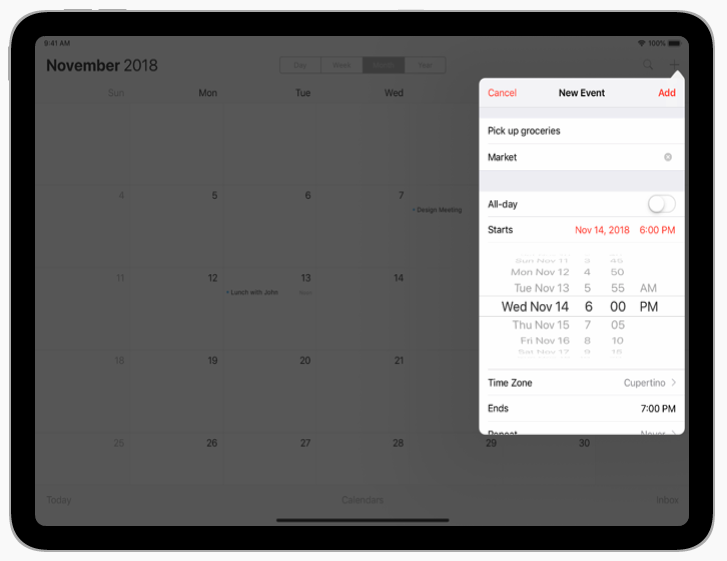
简单来说Popover就是一个在正常操作流程中短暂出现的一个控制区域,一般会出现在iPad这类大屏设备中,并且包含一个指向的view和箭头,比如官方文档中给出的这个日历中添加事项的视图。
一般情况下,一个Popover分为模态结构(modal)和非模态结构(nonmodal),在非模态结构中,通常通过点击其他区域来关闭Popover,
在模态结构中,通过通过点击页面中的取消按钮来关闭Popover。
在苹果官方人机交互文档中,苹果建议使用Popover时遵循这些原则:
- 避免在iPhone上使用Popover
- 使用一个明确的关闭按钮
- 在关闭时自动保存Popover中的状态
- 在屏幕中找到一个合适的位置弹出Popover
- 一次只显示一个Popover
- 不要将Popover放的太大
更多遵循的原则和详细的解析可以参看官方文档对Popover的介绍,链接在最下边参考文档中👇👇👇
接下来我们来看一下如何在iOS中使用Popover。
UIPopoverController
UIPopoverController是专为iPad设计的一个Controller,所以在iPhone中如果使用它会造成崩溃。
不过这个UIPopoverController在iOS9中被苹果弃用了,取而代之的是UIPopoverPresentationController,因为UIPopoverPresentationController支持iOS8+,所以在这个iOS13的时代,我们就不多介绍UIPopoverController了。
UIPopoverPresentationController
UIPopoverPresentationController基本上包括了之前说的UIPopoverController的特性,并且他也可以支持iPhone使用。
那么我们如何来使用它呢,苹果官方文档中有这样一句话:
In nearly all cases, you use this class as-is and do not create instances of it directly. UIKit creates an instance of this class automatically when you present a view controller using the UIModalPresentationStyle.popover style. You can retrieve that instance from the presented view controller’s popoverPresentationController property and use it to configure the popover behavior.
也就是说,我们不需要直接创建UIPopoverPresentationController的实例,当我们创建一个present的Controller时,使用Popover的样式,系统就会自动为我们创建一个实例,我们可以直接通过使用它的 popoverPresentationController属性来对他进行操作。
那么根据官方文档,我们通过简单三行代码,就能创建出一个简单的Popover了。
|
|
然后愉快的在iPhone上测试一下
发现和正常的present好像没什么区别,那看看iPad的上表现吧,运行起来之后,发现程序崩溃了,仔细看一下崩溃的信息
|
|
原来是需要一个sourceView或者barButtonItem,在iPad中使用过UIAlertController应该对这个崩溃信息不陌生。那么除了要设置这个,如果定制一个Popover我们还需要使用些什么呢?
因为整个Popover基本上都是用于iPad的,并且苹果官方也不太建议在iPhone上使用,所以接下来的部分我们就不涉及在iPhone中使用Popover了,所有的内容都以iPad为标准介绍。
barButtonItem
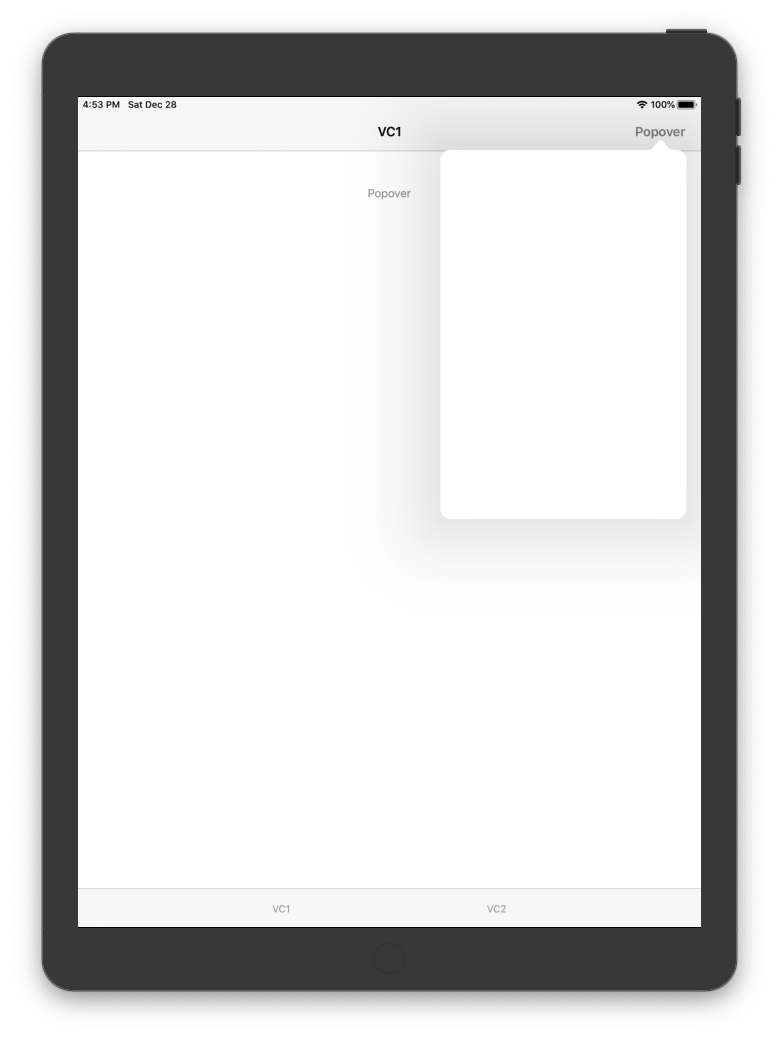
这个属性一般用于点击导航栏的barButtonItem时显示Popover,他会自动设置Popover的SourceView和SourceRect,设定了之后,再在iPad上跑起来,点击导航栏上的Popover按钮,就可以看到,Popover已经弹出来了。
|
|
sourceView 和 sourceRect
但是我们往往需求中,要求Popover不是指向于一个barButtonItem,而是我们自定义的一个view和位置,这时候就需要用到这两个属性了。
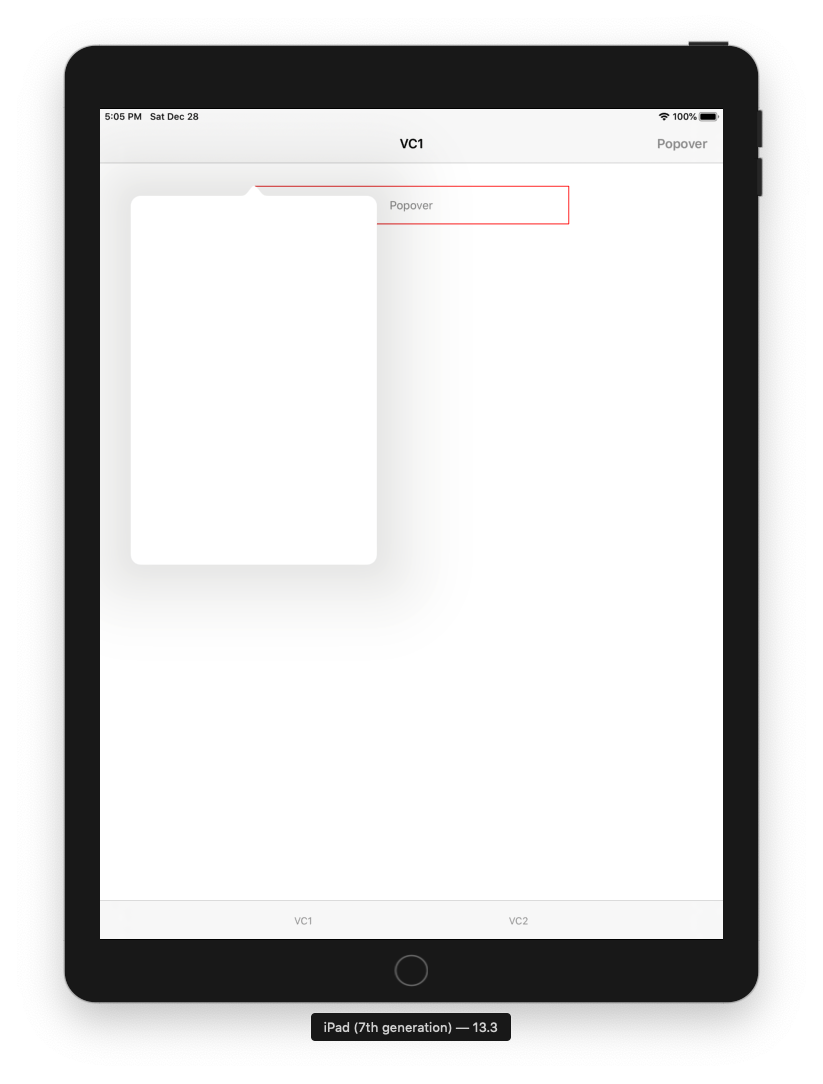
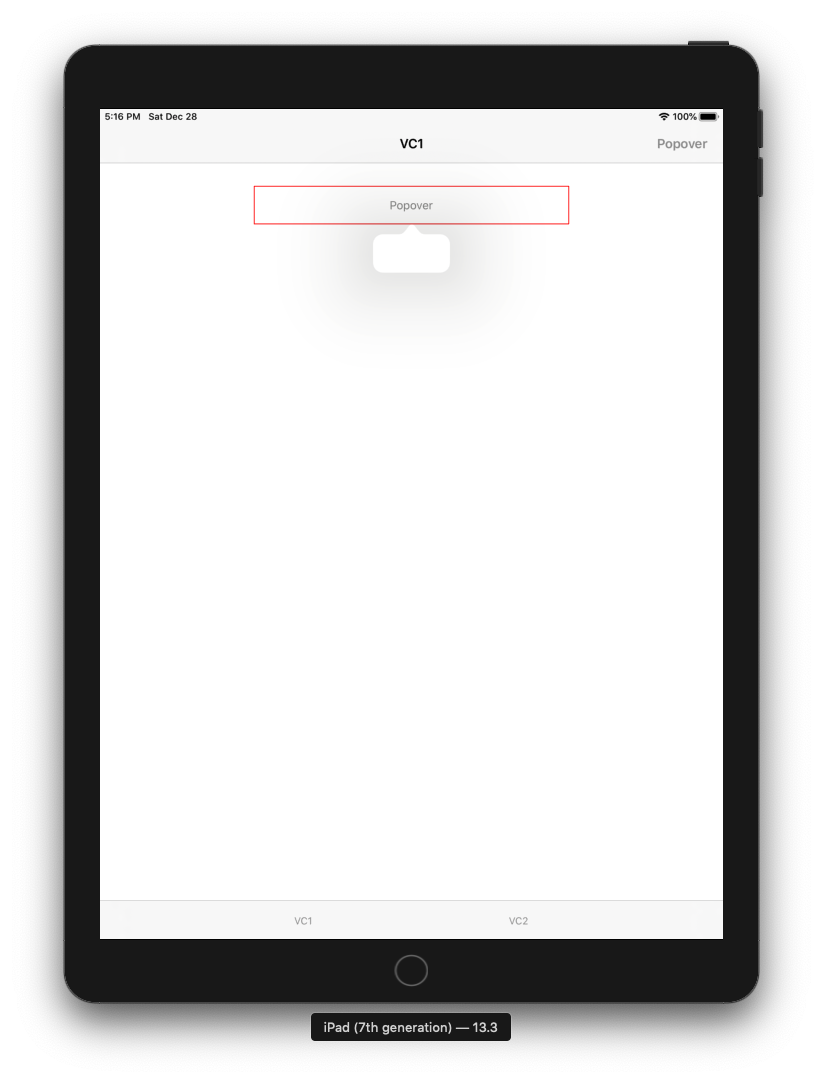
sourceView为我们的Popover指向的view;
sourceRect为我们指向的基于sourceView的位置,默认为CGRectZero。
也就是说,默认情况下,这段代码的指向是这样的(截图中红框为button的frame):
|
|
[image:DAEFFF68-7BA2-4C2E-9276-5264A0C302FB-373-0000329F192EAAEC/截屏2019-12-28下午5.05.01.png]
那么,如果我们想要将箭头指向button的下部中间位置,我们需要修改sourceRect
|
|
permittedArrowDirections
这个属性表示的是允许的方向,这个应该很好理解,就不多做介绍了。
arrowDirection
这个属性表示箭头指向的方向,在弹出Popover之前,这个属性为unknow。
修改Popover的大小
在popoverPresentationController中,并没有修改Popover的大小的属性,我们需要使用UIViewController中的preferredContentSize属性来修改Popover的大小。
这样一来,定制一个Popover的基本操作就完成了。
如下代码就可以展示出一个这样的Popover,当然Popover中的具体内容,可以直接在Popover的Controller中绘制。
|
|
外观属性
另外还有一些控制Popover外观的属性,比如:
- popoverLayoutMargins:定义Popover允许展示的区域之前的间隙
- backgroundColor:背景色
- passthroughViews:当Popover显示的时候,当前Controller其他可以交互的view
- popoverBackgroundViewClass:自定义Popover的箭头高度位置等等
- canOverlapSourceViewRect:Popover是否与sourceView重叠
等等。这些属性都很好理解,在使用的时候不明白的地方查查官方文档就都很清楚了。
最后
以上就是在iOS中使用Popover的一些简单介绍,主要还是以UIPopoverPresentationController为主,当然了还有一些其他的比如在iPad中使用UIAlertController时也会遇到这个问题。但是基本上也都是一样的东西,这里也就不多赘述了。
本文章仅限个人学习使用,如果有什么问题欢迎大家批评指正。
参考文档
Popovers - Views - iOS - Human Interface Guidelines - Apple Developer
UIPopoverPresentationController - UIKit | Apple Developer Documentation