iOS粒子系统CAEmitterLayer的使用

CAEmitterLayer是苹果在iOS 5时候开始引入的CALayer的一个子类,它是一个高性能的粒子引擎,可以用来实现一些比如下雨、烟雨、火焰的效果。比如微信中实现的表情从天而降的效果就是通过它来实现的。

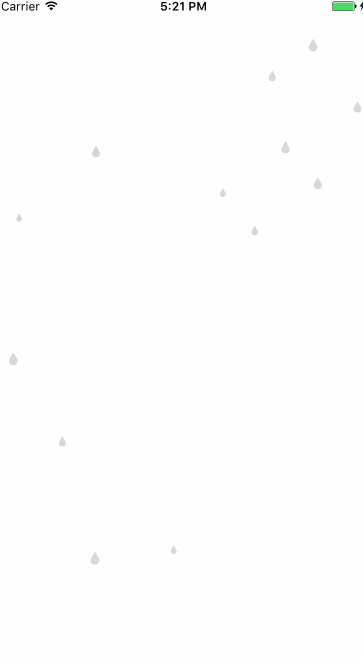
下图就是一个使用CAEmitterLayer实现的雨的效果。

logo

看起来很厉害的效果其实实现起来非常简单,并且苹果也对他的性能做了很好的处理,下边我们就来先了解一下它。

CAEmitterLayer

那我们就先来说说CAEmitterLayer,假设我们需要实现一个下雨的效果,那么如果把我们的应用比作是一个世界,CAEmitterLayer就代表能够下雨的云有多大,他的范围决定了雨滴会出现的位置。

CAEmitterLayer有很多属性,通过设置这些属性可以满足我们需要的大多数场景的效果,下边我们就来看看一些主要的属性有什么作用。

1
2
3
4
5
6
7
/* The center of the emission shape. Defaults to (0, 0, 0). Animatable. */
@property CGPoint emitterPosition;
@property CGFloat emitterZPosition;
//这是一个坐标位置,代表发射源的中心位置,如果用下雨来比喻的话就是用来下雨的云的中心位置。
//注意因为是空间坐标,所以还有z轴的属性。
1
2
3
4
5
6
7
8
9
/* The size of the emission shape. Defaults to (0, 0, 0). Animatable.
* Depending on the `emitterShape' property some of the values may be
* ignored. */
@property CGSize emitterSize;
@property CGFloat emitterDepth;
//这是一个大小属性,用来代表发射区域的大小,如果用下雨来比喻的话就是用来下雨的云的大小。
//因为是空间的属性,所以还有代表纵深的属性。
1
2
3
4
5
6
7
8
9
10
11
12
13
14
15
16
17
18
19
20
21
22
/* A string defining the type of emission shape used. Current options are:
* `point' (the default), `line', `rectangle', `circle', `cuboid' and
* `sphere'. */
@property(copy) NSString *emitterShape;
//这个代表了发射源的形状,可以选择线性、弧形等不同的发射方式。可选值如下:
/** `emitterShape' values. **/
CA_EXTERN NSString * const kCAEmitterLayerPoint
CA_AVAILABLE_STARTING (10.6, 5.0, 9.0, 2.0);
CA_EXTERN NSString * const kCAEmitterLayerLine
CA_AVAILABLE_STARTING (10.6, 5.0, 9.0, 2.0);
CA_EXTERN NSString * const kCAEmitterLayerRectangle
CA_AVAILABLE_STARTING (10.6, 5.0, 9.0, 2.0);
CA_EXTERN NSString * const kCAEmitterLayerCuboid
CA_AVAILABLE_STARTING (10.6, 5.0, 9.0, 2.0);
CA_EXTERN NSString * const kCAEmitterLayerCircle
CA_AVAILABLE_STARTING (10.6, 5.0, 9.0, 2.0);
CA_EXTERN NSString * const kCAEmitterLayerSphere
CA_AVAILABLE_STARTING (10.6, 5.0, 9.0, 2.0);
1
2
3
4
5
6
7
8
9
10
11
12
13
14
15
16
17
18
/* A string defining how particles are created relative to the emission
* shape. Current options are `points', `outline', `surface' and
* `volume' (the default). */
@property(copy) NSString *emitterMode;
//这个代表了发射源的模式,可选值如下:
/** `emitterMode' values. **/
CA_EXTERN NSString * const kCAEmitterLayerPoints
CA_AVAILABLE_STARTING (10.6, 5.0, 9.0, 2.0);
CA_EXTERN NSString * const kCAEmitterLayerOutline
CA_AVAILABLE_STARTING (10.6, 5.0, 9.0, 2.0);
CA_EXTERN NSString * const kCAEmitterLayerSurface
CA_AVAILABLE_STARTING (10.6, 5.0, 9.0, 2.0);
CA_EXTERN NSString * const kCAEmitterLayerVolume
CA_AVAILABLE_STARTING (10.6, 5.0, 9.0, 2.0);
1
2
3
4
5
6
/* The array of emitter cells attached to the layer. Each object must
* have the CAEmitterCell class. */
@property(nullable, copy) NSArray<CAEmitterCell *> *emitterCells;
//这是代表的是粒子的内容,如果比作下雨的话就是雨滴,这个属性的具体使用我们在下一部分具体的介绍。

CAEmitterLayer的主要属性就是这些,通过这些属性的设置我们已经可以创建一个很好的”云”了,接下来我们来看下“雨滴”的实现方式。

CAEmitterCell

CAEmitterCell就是用来实现我们粒子效果中的粒子,用之前的比喻来说就是雨滴。

CAEmitterCell的创建方式也很简单,只需要调用一个类方法就可以了。

1
+ (instancetype)emitterCell;

下边我们来看一下CAEmitterCell的主要属性。

1
2
3
4
5
6
/* The number of emitted objects created every second. Default value is
* zero. Animatable. */
@property float birthRate;
//代表每秒钟生成粒子的数量。
1
2
3
4
5
6
7
8
9
/* The lifetime of each emitted object in seconds, specified as a mean
* value and a range about the mean. Both values default to zero.
* Animatable. */
@property float lifetime;
@property float lifetimeRange;
//设定粒子存在的时间
//lefttimeRange可以对粒子存活的时间做一个范围的限定,比如lefttime = 10,lefttimeRange = 3,那么粒子的实际存活时间就在7~13之间。
1
2
3
4
5
6
7
/* An angle (in radians) defining a cone around the emission angle.
* Emitted objects are uniformly distributed across this cone. Defaults
* to zero. Animatable. */
@property CGFloat emissionRange;
//粒子的发射角度,使用弧度制。
1
2
3
4
5
6
7
/* The initial mean velocity of each emitted object, and its range. Both
* values default to zero. Animatable. */
@property CGFloat velocity;
@property CGFloat velocityRange;
//代表粒子的初始速度,velocityRange的使用方法和存活时间的使用方法相同。
1
2
3
4
5
6
7
8
/* The acceleration vector applied to emitted objects. Defaults to
* (0, 0, 0). Animatable. */
@property CGFloat xAcceleration;
@property CGFloat yAcceleration;
@property CGFloat zAcceleration;
//每个值代表每个轴方向的加速度。
1
2
3
4
5
6
7
8
9
/* The scale factor applied to each emitted object, defined as mean and
* range about the mean. Scale defaults to one, range to zero.
* Animatable. */
@property CGFloat scale;
@property CGFloat scaleRange;
@property CGFloat scaleSpeed;
//代表粒子的缩放大小,scaleRange代表范围,使用方法和存活时间以及初始速度相同。
1
2
3
4
5
6
7
/* The rotation speed applied to each emitted object, defined as mean
* and range about the mean. Defaults to zero. Animatable. */
@property CGFloat spin;
@property CGFloat spinRange;
//代表粒子的旋转速度,弧度制,spinRange同上。
1
2
3
4
5
6
7
/* The mean color of each emitted object, and the range from that mean
* color. `color' defaults to opaque white, `colorRange' to (0, 0, 0,
* 0). Animatable. */
@property(nullable) CGColorRef color;
//可以把粒子变成你想要的颜色。
1
2
3
4
5
6
/* The cell contents, typically a CGImageRef. Defaults to nil.
* Animatable. */
@property(nullable, strong) id contents;
//粒子的内容,

以上就是粒子的属性,通过这些属性基本上可以实现我们想要的大部分效果了。

Demo

Demo其实特别简单,只要把上边说到的属性用上之后就可以实现下雨的效果了。

实现代码如下:

1
2
3
4
5
6
7
8
9
10
11
12
13
14
15
16
17
18
19
20
21
22
23
24
25
26
27
28
self.rainView = [[UIView alloc] init];
self.rainView.frame = self.view.bounds;
self.rainView.backgroundColor = [UIColor clearColor];
self.waterCell = [CAEmitterCell emitterCell];
self.waterCell.birthRate = 5.0;
self.waterCell.lifetime = 40.0;
self.waterCell.lifetimeRange = 10;
self.waterCell.velocity = 30;
self.waterCell.velocityRange = 10;
self.waterCell.yAcceleration = 30;
self.waterCell.emissionRange = 0;
self.waterCell.scale = 0.1;
self.waterCell.scaleRange = 0.05;
self.waterCell.contents = (id)[[UIImage imageNamed:@"Ovalwater"] CGImage];
self.waterLayer = [CAEmitterLayer layer];
self.waterLayer.emitterPosition = CGPointMake(self.view.bounds.size.width/ 2.0, -10);
self.waterLayer.emitterSize = CGSizeMake(self.view.bounds.size.width, 0.0);
self.waterLayer.emitterShape = kCAEmitterLayerLine;
self.waterLayer.emitterMode = kCAEmitterLayerVolume;
self.waterLayer.velocity = 5;
self.waterLayer.emitterCells = @[self.waterCell];
[self.rainView.layer addSublayer:self.waterLayer];
[self.view addSubview:self.rainView];

最后,demo地址在这里