iOS开发-自动打包初步探究

最近项目进入版本开发末期,每天都有至少两到三次给测试打包的要求,由于项目用的又是用React Native写的,所以每次打包就非常麻烦,需要先将React Native的代码打包拖入iOS的文件夹中,然后再使用Xcode打包,打包好之后还要将打好的包导出,最后再把ipa包上传到蒲公英上供测试下载。这一系列操作都中每一个耗时都不少,而且还需要人一直在关注着走到哪一步,然后继续往下操作,不仅耽误时间,而且麻烦的要死,所以一个自动打包的脚本就显得非常有必要了。

xcodebuild

说到自动打包,最重要的一点就是需要依赖于xcodebuild了。xcodebuild是苹果发布的自动构建工具,可以通过在terminal中输入命令来达到我们在Xcode中点击运行等很多操作。

OK废话不多说,xcodebuild要怎么使用呢?

其实很简单,在terminal中输入 man xcodebuild 或者 xcodebuild --help就可以看到xcodebuild支持的命令了。

logo

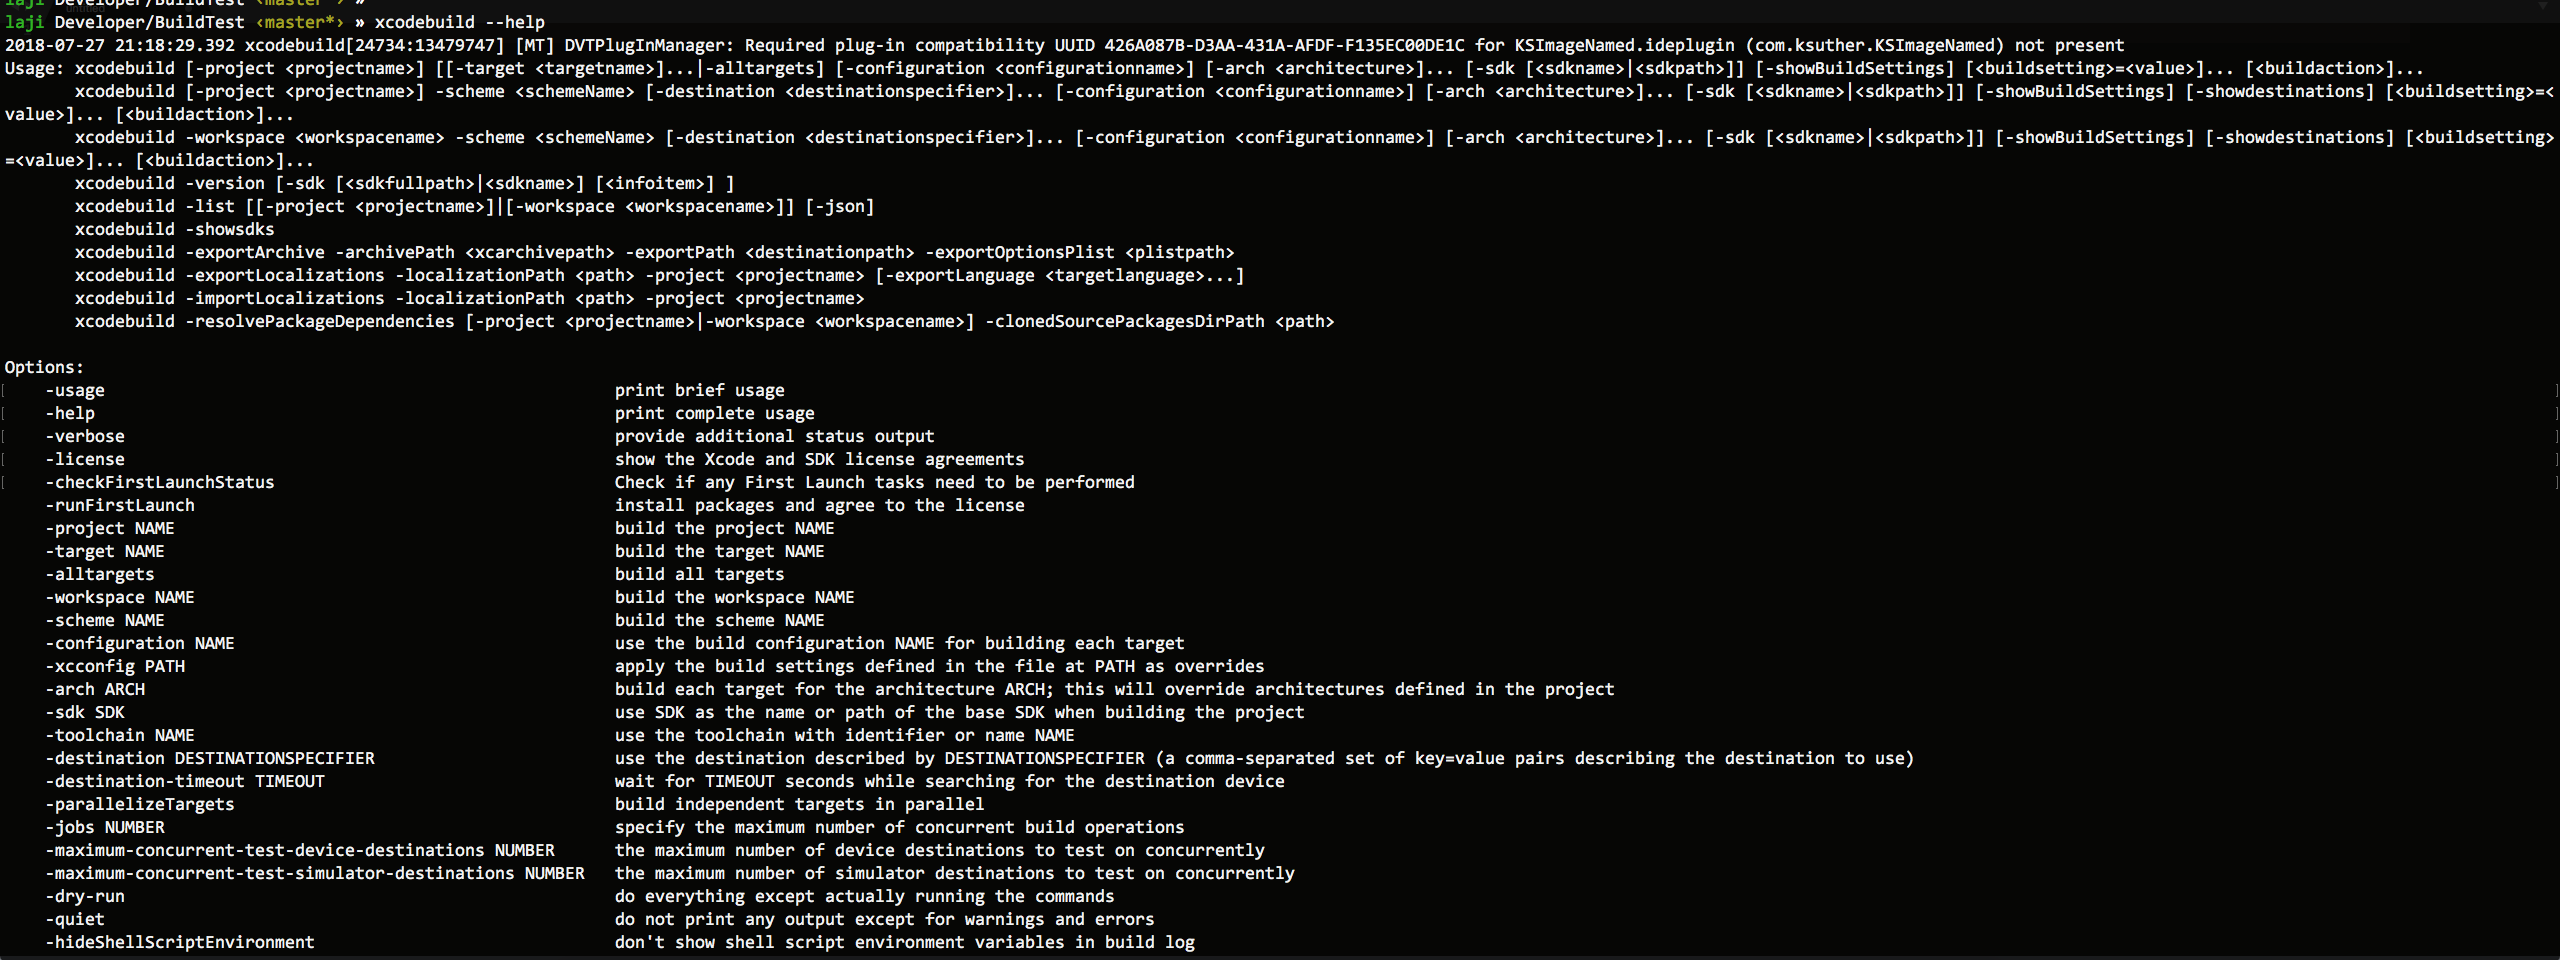
这里边基本上每个命令都会用相应的解释,这里我们就列出几个比较常用的命令参数:

参数 说明
-project name.xcodeproj 在当前目录下有多个项目是需要指定改参数
-target targetname 如果不指定的话默认会构建第一个target
-alltargets 表示同时构建所有的target
-workspace name.xcwordspace 构建workspace,需要指定scheme
-scheme schemename 指定对应的scheme,构建workspace时必选
-destination destinationspecifier 通过描述使用对应的设备,默认使用当前scheme所匹配的设备
-destination-timeout timeout 搜索对应设备时需要的时间,可以设置搜索超时时间,默认为30s
-configuration configurationname 使用对应的配置进行构建,configurationname一般为Debug或Release
-arch architecture 指定构建的包所支持的指令集 arm64、armv7、armv7s
-sdk sdkfullpath sdkname 针对指定的SDK选择合适的构建工具构建,如-sdk iphoneos
-showsdks 列出所有的SDK,一般列出的后面会跟上版本号,-sdk不写版本号默认为所有版本
-list 列出当前项目所有的 Targets、Build、Configurations、Schemes
-derivedDataPath path 构建成功时相关的缓存文件默认路径
-archivePath xcarchivepath 设置导出的.xcarchive文件的路径
参数 说明
build 构建target,当没有其他action指定时,这是xcodebuild默认的一个action
build-for-testing 构建target和对应的相关单元测试,需要指定scheme
analyze 构建和分期target或scheme,需要指定scheme
archive 存档对应的构建scheme,需要指定scheme
test 从SYMROOT目录测试scheme,需要指定scheme和可选的destination
install 构建target然后安装到target的安装目录和发布目录(DSTROOT)
clean 从构建目录(SYMROOT)删除构建时的products和一些中间文件

有了xcodebuild的解释,再加上上边这些解释,应该已经清楚要怎么来通过terminal来编译、打包、导出我们的项目了吧?还不懂?没关系,我写几个常用的给你看。

对了对了,补上一个Xcode的project的架构图应该能看的更清楚一些:

logo

打包命令

xcodebuild archive -workspace wallet.xcworkspace -scheme wallet -archivePath wallet.xcarchive

打包可以使用xcodebuild archive

1
2
3
4
5
6
xcodebuild archive -workspace(或-project) 工作空间名.xcworkspace
-scheme 项目名称
-configuration 构建配置
-archivePath 导出archive包存储路径
CODE_SIGN_IDENTITY=证书
PROVISIONING_PROFILE=描述文件UUID

其中:

  • 1.workspace/project: 就是项目的名称,如果使用cocospod的一般为workspace,加上后缀就可以使用了。
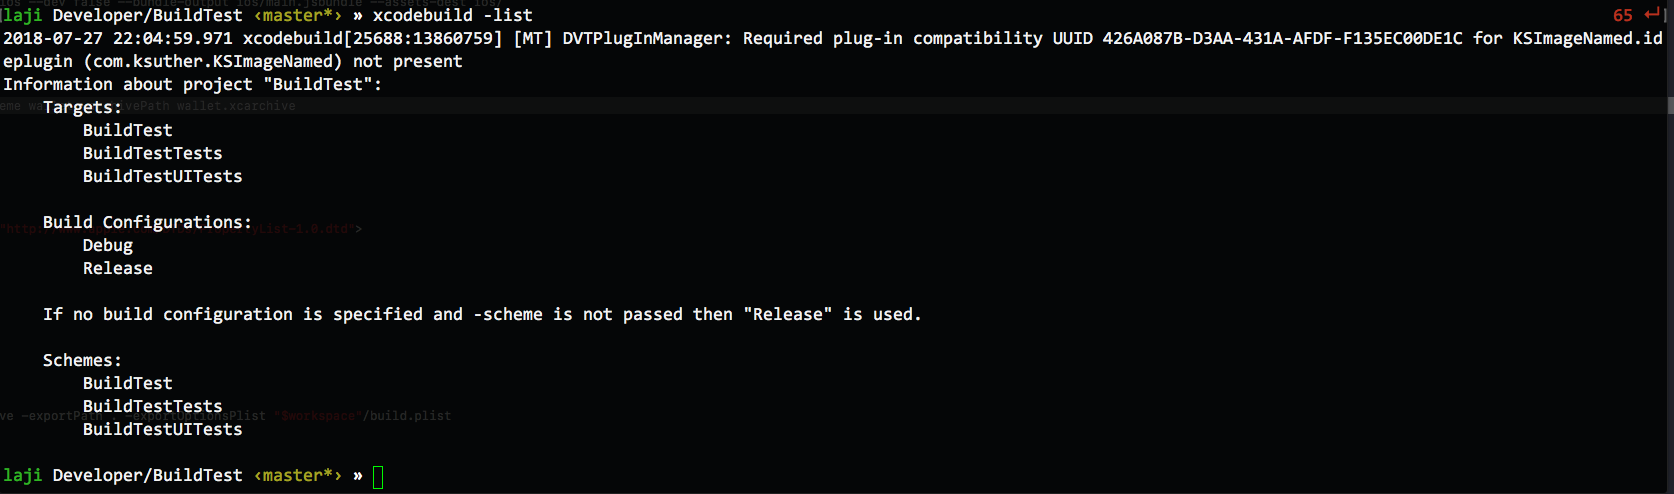
  • 2.scheme:一般情况下也是项目名称,可以通过xcodebuild -list获取。
  • 3.configuration:可以选择Debug或Release模式,一般打包给测试的话使用Release比较好。
  • 4.archivePath:导出archive所存储的路径,这个不用多说。
  • 5.CODE_SIGN_IDENTITY:证书的Identity,稍等我们来讲一下如何获取这个。
  • 6.PROVISIONING_PROFILE:描述文件的UUID,稍等我们来将一下如何获取。

其中如果使用workspace时,scheme是必须填写的,而project则不需要,configuration默认为Release也可以省略,CODE_SIGN_IDENTITY和PROVISIONING_PROFILE也可以使用默认的配置不指定。其他都为必填项。

获取scheme

cd到项目目录下,通过xcodebuild -list就可以获取当前项目的scheme。

logo

获取 CODE_SIGN_IDENTITY

打开钥匙串->选中你的证书->右键->显示简介,你的证书的标题就是CODE_SIGN_IDENTITY了。

获取 PROVISIONING_PROFILE

使用

1
xcodebuild -target <target> -configuration <configuration> -showBuildSettings

命令就可以看到当前项目的 PROVISIONING_PROFILE 了。

导出打包后的ipa

上边的打包操作看懂后,xcodebuild的操作你应该就完全懂了吧?还不懂???

再来一个

导出打包后的ipa文件。

可以使用xcodebuild -exportArchive

xcodebuild -exportArchive -archivePath wallet.xcarchive -exportPath . -exportOptionsPlist “$workspace”/build.plist

1
2
3
4
5
xcodebuild -exportArchive -archivePath archive文件的地址.xcarchive
-exportPath 导出的文件夹地址
-exportOptionsPlist exprotOptionsPlist.plist
CODE_SIGN_IDENTITY=证书
PROVISIONING_PROFILE=描述文件UUID

其中-archivePath和exportPath以及-exportOptionsPlist是必须要传入的,其他两个和之前一样,可以不必穿进去。前两个参数都是路径,就不多说了,接下来着重介绍一下这个plist文件。

exprotOptionsPlist.plist

这个plist文件标注了导出包时的一些设定,其实就是在我们使用Xcode导出包时需要选择的一些东西。

1
2
3
4
5
6
7
8
9
10
11
12
<?xml version="1.0" encoding="UTF-8"?>
<!DOCTYPE plist PUBLIC "-//Apple//DTD PLIST 1.0//EN" "http://www.apple.com/DTDs/PropertyList-1.0.dtd">
<plist version="1.0">
<dict>
<key>teamID</key>
<string>UA11AAJJKK8</string> //TeamID
<key>method</key>
<string>ad-hoc</string> //ad-hoc打包
<key> compileBitcode</key> //是否编译bitcode
<false/>
</dict>
</plist>

在文档中还有一些其他的key和解释,这里就直接贴出来不做多解释了。

1
2
3
4
5
6
7
8
9
10
11
12
13
14
15
16
17
18
19
20
21
22
23
24
25
26
27
28
29
30
31
32
33
34
35
36
37
38
39
40
41
Available keys for -exportOptionsPlist:
compileBitcode : Bool
For non-App Store exports, should Xcode re-compile the app from bitcode? Defaults to YES.
embedOnDemandResourcesAssetPacksInBundle : Bool
For non-App Store exports, if the app uses On Demand Resources and this is YES, asset packs are embedded in the app bundle so that the app can be tested without a server to host asset packs. Defaults to YES unless onDemandResourcesAssetPacksBaseURL is specified.
iCloudContainerEnvironment
For non-App Store exports, if the app is using CloudKit, this configures the "com.apple.developer.icloud-container-environment" entitlement. Available options: Development and Production. Defaults to Development.
manifest : Dictionary
For non-App Store exports, users can download your app over the web by opening your distribution manifest file in a web browser. To generate a distribution manifest, the value of this key should be a dictionary with three sub-keys: appURL, displayImageURL, fullSizeImageURL. The additional sub-key assetPackManifestURL is required when using on demand resources.
method : String
Describes how Xcode should export the archive. Available options: app-store, ad-hoc, package, enterprise, development, and developer-id. The list of options varies based on the type of archive. Defaults to development.
onDemandResourcesAssetPacksBaseURL : String
For non-App Store exports, if the app uses On Demand Resources and embedOnDemandResourcesAssetPacksInBundle isn't YES, this should be a base URL specifying where asset packs are going to be hosted. This configures the app to download asset packs from the specified URL.
teamID : String
The Developer Portal team to use for this export. Defaults to the team used to build the archive.
thinning : String
For non-App Store exports, should Xcode thin the package for one or more device variants? Available options: <none> (Xcode produces a non-thinned universal app), <thin-for-all-variants> (Xcode produces a universal app and all available thinned variants), or a model identifier for a specific device (e.g. "iPhone7,1"). Defaults to <none>.
uploadBitcode : Bool
For App Store exports, should the package include bitcode? Defaults to YES.
uploadSymbols : Bool
For App Store exports, should the package include symbols? Defaults to YES.

写一个打包的脚本

因为我这边的情况是需要打包RN,然后打包项目最后传到蒲公英上,所以我就先就针对这个流程写一个脚本,如果你的需求跟我不一样,这个脚本可能还需要你自己来修改一下。

打包ReactNative代码

打包RN的代码主要会生成一个.jsbundle文件和图片asset文件夹。

1
react-native bundle --entry-file index.js --platform ios --dev false --bundle-output ios/main.jsbundle --assets-dest ios/

打包iOS项目并导出ipa包

这里有了前边的铺垫应该不需要再赘述太多了,直接上命令了,其中‘[]’中的内容需要替换成你自己的项目名称。

1
2
3
4
5
6
7
8
9
10
11
12
13
14
15
16
17
18
19
cd ios
xcodebuild archive -workspace [workspace name].xcworkspace -scheme [scheme name] -archivePath [xcarchive name].xcarchive
# ad-hoc、enterprise、development、app store
cat << EOF > ../build.plist
<?xml version="1.0" encoding="UTF-8"?>
<!DOCTYPE plist PUBLIC "-//Apple//DTD PLIST 1.0//EN" "http://www.apple.com/DTDs/PropertyList-1.0.dtd">
<plist version="1.0">
<dict>
<key>method</key>
<string>$1</string>
<key>compileBitcode</key>
<false/>
</dict>
</plist>
EOF
xcodebuild -exportArchive -archivePath [xcarchive name].xcarchive -exportPath . -exportOptionsPlist "$workspace"/build.plist

上传到蒲公英

蒲公英有提供专门的API接口,可以直接通过这个接口传入相应的参数,就可以将ipa包直接传到蒲公英上了。

上传接口的接口文档在这里

脚本如下,同样[]中的内容需要你自己替换。

1
curl -F 'file=@wallet.ipa' -F '_api_key=[your apiKey]' -F 'appKey=[your appKey]' https://www.pgyer.com/apiv2/app/upload

脚本

将上述的主要内容加上一些辅助的代码,写成一个shell脚本就为:

1
2
3
4
5
6
7
8
9
10
11
12
13
14
15
16
17
18
19
20
21
22
23
24
25
26
27
28
29
30
31
32
33
34
35
36
37
38
39
40
41
42
43
44
45
46
47
#!/bin/sh
if [ -z "$1" ]
then
echo "输入参数:ad-hoc、enterprise、development、app store"
fi
workspace=`pwd`
cd "$workspace"
echo "开始编译RN"
react-native bundle --entry-file index.js --platform ios --dev false --bundle-output ios/main.jsbundle --assets-dest ios/
echo "开始打包iOS"
cd ios
xcodebuild archive -workspace [workspace name].xcworkspace -scheme [scheme name] -archivePath [xcarchive name].xcarchive
# ad-hoc、enterprise、development、app store
cat << EOF > ../build.plist
<?xml version="1.0" encoding="UTF-8"?>
<!DOCTYPE plist PUBLIC "-//Apple//DTD PLIST 1.0//EN" "http://www.apple.com/DTDs/PropertyList-1.0.dtd">
<plist version="1.0">
<dict>
<key>method</key>
<string>$1</string>
<key>compileBitcode</key>
<false/>
</dict>
</plist>
EOF
xcodebuild -exportArchive -archivePath [xcarchive name].xcarchive -exportPath . -exportOptionsPlist "$workspace"/build.plist
echo "上传到蒲公英"
curl -F 'file=@wallet.ipa' -F '_api_key=[your apiKey]' -F 'appKey=[your appKey]' https://www.pgyer.com/apiv2/app/upload
echo "成功!"

这时候调用sh package.sh + [method] 传入打包的参数就可以了,如果一般传入到蒲公英或者fir需要打development的包就直接传入development即可。

使用ApplicationLoader上传到App Store(8.17补充)

之前说了使用蒲公英集成,但是如果需要传到App Store时还是很麻烦,这时候我们需要用到Xcode中的ApplicationLoader工具,ApplicationLoader是用来提交二进制文件到AppStore的小工具。

ApplicationLoader在终端中是通过altool使用,在Xcode中可以通过点击Xcode左上角Xcode -> Open Developer Tool -> Application Loader打开。

altool工具的路径是/Applications/Xcode.app/Contents/Applications/Application\ Loader.app/Contents/Frameworks/ITunesSoftwareService.framework/Support/altool

具体的使用可以通过验证+上传两个命令使用:

1
2
3
$ altool --validate-app -f file -u username [-p password] [--output-format xml]
$ altool --upload-app -f file -u username [-p password] [--output0format xml]

其中这几个参数的意义:

参数 意义
–validate-app 需要验证的应用
–upload-app 需要上传的应用
-f file 需要验证或上传的应用的路径和文件名
-u username itunesConnect的用户名(Apple ID账号)
-p password itunesConnect的密码 (Apple ID密码)
– output-format [xml normal] 需要Application Loader以结构化的XML格式还是非结构化的文本格式返回输出信息。

最后

这里只是对iOS自动打包一个初步的使用,还可以使用Jenkins等工具进行更高自动化的CI持续集成,本篇文章也仅限个人学习使用,如果有什么不正确的地方也请各位大神多多指教。

参考文档

关于xcodebuild
Xcode Build Settings Reference
关于iOS自动化打包的一些分享
使用Jenkins进行持续集成
iOS 应用打包命令一览
iOS一键搞定自动打包并发布到AppStore和Fir
使用xcodebuild打包 导出ipa 上传蒲公英或者提交AppStore